
Builders, if you’ve been tasked with installing a shower niche, rest easy! We’ve compiled the ultimate guide to niche installation to help you get the job done. With The Niche Man, it won’t be as difficult as you may expect. Let’s get started.
Step 1: Choose a shower niche made from quality materials
A common complaint from builders about shower niches is that they can often be the source of water leakage. This isn’t the case with our 100% waterproof prefab shower niches.
Our niches are Australian made from high quality materials. They’re made from a 100% waterproof, closed-cell, high density polyurethane rigid panel, and they’re perfectly square for easy install.
All The Niche Man niches come pre-coated in Ardex Primer WPM 368– a versatile water-based primer expertly designed with advanced adhesion properties.
You can learn more about the details by viewing our product specifications, terms and conditions.
Step 2: Measure up
Making sure your niche will slot into the space is easy. Start by planning your shower niche, working out where it will be positioned in the shower.
Next, get your external and internal measurements.
External measurements
Hold your measuring tape parallel to the stud and to the noggin. Be aware that when measuring, you should allow an extra 5mm. This allows the niche and the adhesive to easily slide in and ensures it will be level.
Repeat this process to measure the height of the niche. Ensure you don’t measure on an angle – it must be parallel.
Repeat this process to measure the depth of the niche. Most homes use a 90mm stud, although you could be working with 75mm or 80mm.
* Keep in mind, it is NOT required to add the extra 5mm to the depth measurement.
Watch our video tutorial below for more assistance with measuring up your shower niche:
Internal measurements
Hold the tape parallel with the niche, then go ahead and measure.
Repeat this process to measure the height.
Repeat this process once more to measure the depth.
Watch our video tutorial below to see the steps more closely:
Step 3: Order your niche
We make the order process efficient and easy. If you’re ordering a standard niche size, you can place an order through our online store.
If you’re after a custom shape or size, you can request a quote online. Fill out the form, including all of your specific requirements, and we’ll supply a quote within 48 hours.
Get in touch with us for information on our special trade pricing. We can also answer any questions and help you plan your project if you have a unique situation (we love a challenge!).
Step 4: Install the shower niche
At The Niche Man we take pride in making installation easy for builders.
How to install a shower niche
Follow these steps to install your shower niche:
Apply a continuous line of polyurethane adhesive to the surrounding framework (IMPORTANT: ONLY use polyurethane adhesive when installing niches.)
Place the niche into the correct position
Ensure that the niche is level
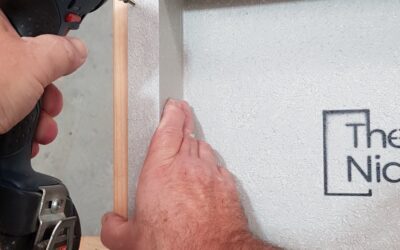
Using 30mm screws, fix at 300mm intervals. It is important to screw through the front reveal only.
Have your tiler tile over the top (or not, if it’s a prefinished niche).
Watch our step-by-step tutorial below:
So there you have it!
At The Niche Man we strive to make the installation process easy for builders. Plenty of our clients use our niches for DIY bathroom renos, because they’re so easy to use. Give the product a try, and we guarantee you won’t look back.
Have a question? Give us a call – we’d be happy to help.